|

■Before you start
Welcome to “Planet Talk”.
Carefully follow the instruction to create your Planet Talk.
The editor is made very simply, so just enjoy playing.
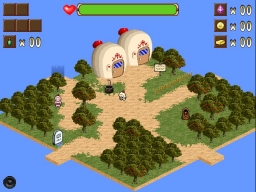
First, let’s create your “village”.
Here are some of the things you can start doing once you make your own village.
・Name the characters and have them talk.
・Add maps to write and map your journey like a diary.
・Have characters say what you want to say.
・Describe your world.
Now, let’s get it started.
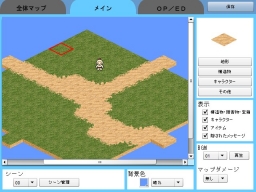
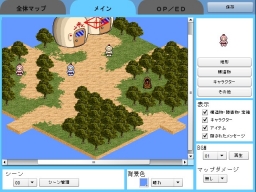
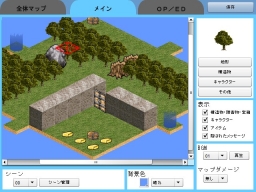
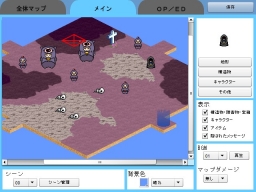
●1 Design your map
From the main tab, find “geography” and click it.
Choose any geography you want to place, and color the map as you like.
There are several sets of geography.
You can only choose one set per map.
Remember that characters and buildings CANNOT be placed on water,
so consider where the characters should go when designing your geography.
You can also make roads, islands of your choice.
※In some geographies, characters lose stamina just by walking.
※The water edge shapes are same all the time.
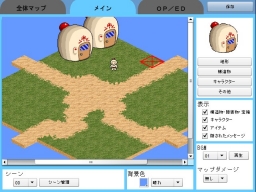
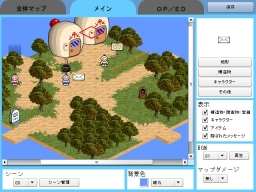
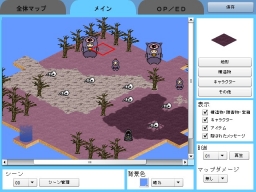
●2 Place buildings
Once you make your geography, next step is to create trees and houses.
On top-right of the main tab screen, find and click “building” and choose a building,
then left-click to place it on a cell.
To erase the building, hold SHIFT and left-click.
Buildings CANNOT be put in the water.
Decorate your map with buildings.
Examples:...
By putting some flowers around your house.
By setting up your friend’s house right next to yours.
By decorating your map with trees.
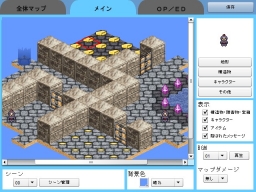
By placing stone statue in a dungeon.
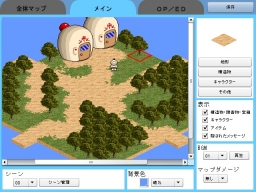
●3 Arrange characters
Now let’s get your characters arranged on your map.
On top-right of the main tab screen, click “character” and choose your character,
then left-click to place it on a cell.
To erase the character, hold SHIFT and left-click.
There are 3 basic characters.
1 The Talk
Talkative and pacifistic personality
Cute brood with a red dot on their head.
2 The Dark
Evil and aggressive personality. Dark skinned. Some of them are monsters.
3 The Alc
Intelligent and noble personality. Pointed head.
These characters move among the three planets. The Dark and The Alc are enemies,
and The Talk is their intermediary. (But it’s your choice to make your own story!)
There are side characters and new characters will be added more and more.
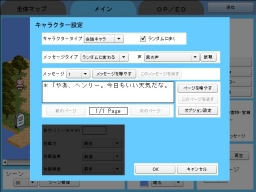
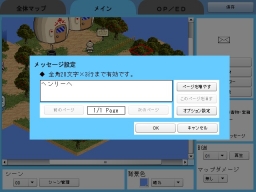
●4 Set the character’s scripts.
Once you set the character, click it.
Character’s set-up window will pop up.
Type any script.
You may have the character talk a longer script by clicking “Add page”
Click OK to finish a script.
Click “Save” to save your map.
To run and test your game, click “Test Play” at a foot of the page.
Your map and characters get on the move!
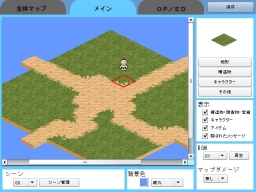
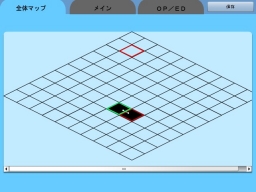
●5 Add a map
Once you learn how to create a map, now it means you can add a map.
Click the bulge on any edge of the map,
a new window will pop up and ask “Do you want to add a map?”, and click “Yes”.
A new map will be created on the side of the bulge you choose.
Added maps are recognized on an “Overall map”.
Add more and more maps and expand your world.
■Once you get used to basic commands (For intermediate players)
●Place hidden items
In “Other layout”, you will find “hidden messages,” the item of letter gets invisible
when you place in the game except you see where you hide it on editor.
To find a letter, click Z to dig the ground.
For example, it’s a good idea to arrange a character to say “I saw something near XX”
to let the other players find the hidden items.
●● Have characters say scripts randomly
In “Character Setting,” change the message type to “Random” and you can add more
scripts by clicking “Add Message”
This makes the characters say the listed scripts randomly.
●Set as a different script pops up after the set number of times you talk to.
In “Character setting,” set the message type as “Change script based on number of
times” and add scripts by clicking “Add message”.
This makes the characters have different responses to you as you talk to them more.
Use this command as your story goes.
●Place doors and keys
There are “Doors and keys” in your layout item list.
These are corresponding to each other. Using the corresponding key can open the door.
In doing so, you can set up traps such as
“I was not able to go ahead because the closed door bothered me.”
“But I can open the doors with the corresponding keys and move on.”
Key can be placed on your map and set up to be given by certain characters.
Here are other corresponding items.
・Rocks and magic wand
・Stumps and axes
Therefore, these could happen like
“I have been struggling with doors and rocks.”
“but I’ve got keys to open the corresponding doors!”
“Furthermore I can clear all the rocks with the magic wand to look ahead!”
and
“I have been struggling with doors.”
“but I’ve gotten keys to open the corresponding doors!”
“but! I see many rocks blocking up ahead.”
“but! I can clear all the rocks with the magic wand to look ahead!”
can happen.
Go ahead and insert various tricks into your story.
●Expose your main character to danger
If you set a character type as “hostile,” it starts attacking the main character using rocks and fireballs.
Those rocks and fireballs damage the main character’s life gauge and when the gauge
(seen on the upper side) turns into all red, the game is over.
The damage level can be set precisely based on speed, intervals, and intensity. (see character setting)
Also in some geography like some wild land geography, the main character gets damaged as he enters the area. Just give it a try and see what’s going to happen.
You can also create a setting that the main character gets damaged as simply going into the certain map. To set this, go to pull-down which is right down side of main tab.
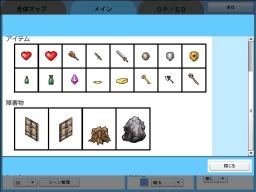
This kind of damage the main character can be reduced by a “shield.” There are three kinds of shields, and the bigger the shield is, the less your damage becomes.
Also you can kill the enemy with “sword”. There are three kinds of swords, and the bigger the sword, the more damage you deliver, therefore you shorten time to kill the enemy.
“Heart” restores your life gauge. The bigger the size, the more life it fills up.
“Medical Bottle” can restore life gauge. (Space key)
The big bottle is ten times as powerful as the small one.
Let’s make some spots where “the points cannot be cleared without items such as swords, shields, and medical bottles” by intentionally placing items which cause some damage on the main character.
This way, you can give other players more excitement and motivation to find such items.
●Place your collection on the map
On your map, you can allocate the following three items you collect.
・Crystal
・Coins
・Gold Nuggets
You can make the number of collections to clear the game.
Collection items can be put on the ground. You can make the setting for the items to be given by other characters.
Collection items make your story more complex by matching corresponding items such as “doors and keys” and even enemies.
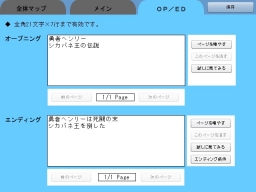
●Set the story ending
To set the story ending, go to “Character Setting”, and click “Option Settings”. When you will find “Set story ending”, make the box checked and set your story ending.
If the number of the collection items is set as 0 on “Ending Condition” (OP/ED tab), it automatically jumps to ending setting.
It is a good idea to insert an epilogue (can be several pages) into the ending scene (and opening as well).
■For those who want to create more advanced story (For the experienced)
●Set the limit
You can set the timer on/off. Go to “Character Settings”, and “Message Option Setting”.
As you set the timer (the number of second), the timer starts count down at the moment you finish the conversation with the certain character. This is the “Countdown to death”.
The game is over when the count goes to zero.
The timer is cancelled when you talk to the character checked “Cancel Timer” at “Message Option Setting”
This function makes your story more exciting in such time limited situations.
・I was cursed and have to go see the churchman.
・I have to bring something to a certain character by a certain time frame.
・I get sick and have to go see the doctor.
and more.
●Make scenes
In this game, the scene means “location” sorted by number. You can manage the progress of your story by locations.
In every scene, you can set “Character Placement” and “Items left behind”, so you can enjoy making tricks.
For example,
・When I talked to a certain character, the other character blocking a passage got out of the way.
・When I talked to a certain character, a new character appeared on another map to tell me an important message.
・When I talked to a certain character, a new item appeared on another map.
Let’s say, a character that was blocking a passage on scene one moves to a different location on scene two after you talked to him.
This function makes the story go smoothly.
To add more scenes, go to main tab and click Add Scene”.
Click “Delete Scene” to erase a chosen scene.
To skip the scenes, go to “Character Setting” and find “Message Option” to set how many scenes you want to skip.
As you add a scene, characters and items are copied from the most recent scene in the past.
Have your story proceed by changing characters, item locations, and scripts on the added scene.
●Advanced Scene Technique
A scene can proceed not only one by one, but by a certain number.
You also can create two scenarios based on the choice the character makes.
If you master scene making, try creating forked stories.
|

|
 日本語
日本語 English